Working Procedure of Fabric Thickness Tester

Working Procedure of Fabric Thickness Tester
Fabric Thickness Tester
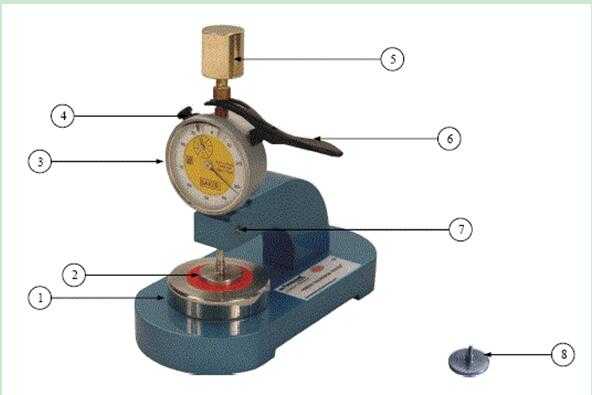
Determination of thickness of fabric samples in laboratory is usually carried out with the help of a precision thickness gauge. In this equipment, the fabric whose thickness is to be determined is kept on a flat anvil and a circular pressure foot is pressed on to it from the top under a standard fixed load. The Dial Indicator directly gives the Thickness in mm.
Details of the Main Unit of Fabric Thickness Tester

1. Anvil.
2. Circular Pressure Foot (Dia. 10 mm).
3. Zero Setting Dial Gauge (Bezel).
4. Knob for zero setting of the Dial Gauge.
5. Dead Weight (As Per Standards).
6. Lifting Lever.
7. Grub Screw for Calibration.
8. Circular Pressure Foot (Dia. 25 mm).
Feature of Fabric Thickness Tester
Specialized equipment to determine the thickness of fabrics.
Latest model with modern aesthetics.
Maximum capacity 10mm & accuracy 0. 01mm.
Portable & handy to carry anywhere.
Smooth precision-engineered components for accurate results.
Analog dial for measuring thickness in millimeters.
Supplied with two pressure feet of different size for different type of fabrics.
A standard Dead weight is provided with the instruments for accurate result.
Supplied with calibration & inspection certificates.
Specification of Fabric Thickness Tester:
Range of measurement : 0 - 10 mm
Least count of dial gauge : 0.01 mm
Diameter of anvil : 60 mm
Diameter of pressure foot (Interchangeable) : 10 mm & 25 mm
Load on pressure foot : 78.5 g (100g/sq. cm)
Throat depth : 22 mm
Overall Dimensions of the Instrument : 115 (L) x 185 (W) x 180 (H) mm 4.5” (L) x 7.5” (W) x 7” (H) Inch
Net Weight of the Instrument : 1.9 Kg. (4.18 lbs)
Working Procedure of Fabric Thickness Tester
The fabric sample that is to be measured is kept on an anvil.
The press foot is gently lowered on to the specimen.
The reading is taken to get the thickness of the specimen.
The flat circular indenter of the micrometer exerts the specified pressure on the fabric sample.
The above procedure is repeated to obtain the values of thickness at least at 3 different locations.
The mean value of all the readings of thickness determined to the nearest 0.01m is calculated and the result is the average thickness of the sample under test.
2016-12-19 17:10

