Site: Home > News and events 

Introduction and analysis of Qinsun multi-finger scratch/mar tester 710
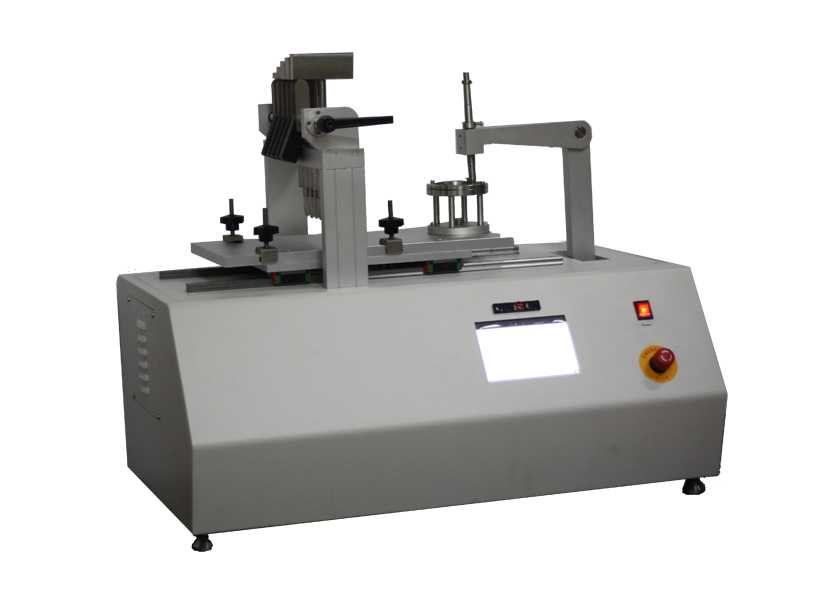
Qinsun multi-finger scratch/mar tester 710 is used to measure the relative resistance or sensitivity of the material surface to scratches, abrasions, gouges, scratches, engraving and other similar physical damages. It is not a normal wear. Based on the equipment described in popular automotive specifications, this instrument is often called a five-finger (five-arm) scratch and abrasion tester, which is often used to evaluate plastics
describe
Multi-finger scratch/mar tester 710 includes a pneumatically driven movable platform on which test samples are installed. The platform moves in a linear manner and is operated by the control knob to perform single or multiple pass tests. The electronic timer displays the speed, and the speed can be controlled by reducing or increasing the air pressure.
The gantry supports five independent spline fingers to provide a constant vertical load on interchangeable scraping heads. The gantry system includes a handle for raising and lowering the arm. In addition, five support frames are included to allow one or more arms to be moved to an upright resting position so that the arms do not touch the sample during the test.
A single weight with different loads is installed on the top of the finger of each arm to apply a standard force on the surface of the test material. Each instrument includes a set of 2N, 3N, 4N, 5N, 6N, 7N, 10N, 15N, and 20N loads. Optional recombination is also provided, including 4N, 8N, 9N, 12N or 8N, 13N, 18N weights. In addition, an optional weight of 25N or a precision weight kit that can achieve a load of 0.6N is also provided.
Although it is common to test flat specimens up to 22 mm thick, the "free-floating" arm fingers allow you to test slightly contoured specimens, as long as they are rigid or adequately supported. The spring-loaded sample holder is standard and can be installed on the end or side of the movable platform for greater flexibility. In order to install the profile specimen, two specimen clamps are provided. The optional 5 mm gasket set can be used to raise the rack to accommodate samples greater than 22 mm thick.

Taber 710 Scratch and Mar tester scratch skill analysis:
Each Multi-finger scratch/mar tester 710 includes a set of five hemispherical scratch tips with a diameter of 1.0mm and a hemispherical scratch tip with a diameter of 7.0mm. Both include a precision tungsten carbide ball mounted on the contact end. The optional tapered scraper tip also has tungsten carbide (0.1 mm; 0.25 mm; 0.4 mm and 0.5 mm diameter) or diamond (90° 3mil or 90° 3.5mil radius point).
Depending on the type of material being evaluated, the visual appearance of scratches usually involves changes in surface topography, color, or brightness. Three methods are generally used:
1. Visual assessment-For this technique, the observer uses a controlled light source to visually inspect each scratch line and score on a scale of 1 to 5 (1 = no scratches at all; 5 = severe scratches). For plastic materials, please indicate whether the line shows signs of whitening.
2. Width/Depth-The operator uses an optical measuring device (such as an optical micrometer) to measure the width and/or depth of the scratch.
3. Image analysis-Another option is to use image analysis techniques, such as SEM.
When describing scratches or abrasions, it is recommended to describe them in detail. Items that may be described include surface topography, material deformation, material removal, and color change. The following features are damaged:
1. Shallow (or deep) scratches
2. The scratches are smooth and the shape is clear (or rough and deformed)
3. Scratches include plastic flow of materials (or cutting, tearing, cracking, chipping, cracking)
4. Scratches include ripple traces visible at the bottom (ie herringbone or parabola)
5. Strain bleaching is visible (or there is no change in color)
Note: The characteristics of plastic materials will greatly affect the evaluation of scratch resistance and scratch resistance. It is important to understand and consider the following factors. For repeatable results, define whether to evaluate immediately after the scratch test or after a set time (for example, 24 hours).
Taber Industries has extensive experience in testing physical properties, including abrasion resistance (abrasion), scratches and abrasions, and material stiffness. You can take advantage of this expertise through the "TABER-Test" program. Whether you are designing a new product or need a fair laboratory evaluation, we can help. Our knowledge includes testing various materials; understanding evaluation standards and supplier requirements; and participating in trade associations and testing method development.
In addition, Taber Industries obtained the ISO/IEC 17025:2017 certification (certification number 102863; certificate L21-138) from Perry Johnson Laboratory Accreditation, Inc.
Comply with ISO/IEC 17025:2017 standard for laboratory certification. This standard is used to manage the laboratory's quality management system (audit and corrective action procedures) and requires compliance with strict technical requirements. The technical capabilities of the Qinsun textile tester laboratory are evaluated and determined to produce consistent, precise and accurate test data.
Send us your product samples, and our internal testing experts will demonstrate how Qinsun instruments can help you with quality control, material development or competitive supplier testing.
When submitting test samples to Qinsun Industries, you need to fill in the test application form and send it along with the samples. This will enable our internal testing experts to better understand your testing needs. Three options are provided:
Product Evaluation-Before you invest in an instrument, our experts will be happy to review your materials. We will conduct feasibility tests on some of your samples or share our past experience to help you determine whether Qinsun products can solve your doubts. This service is provided free of charge.
Detailed-Our experts will analyze your material and provide a detailed report of our investigation results. The report is specific to your company and usually includes test setup, test procedures, test observations, photos, and brief data analysis. The cost of this service depends on the type and number of tests requested.
3rd party testing-Qinsun's internal testing laboratory also conducts independent testing. If you need to test according to the specific method of the reference Qinsun instrument, but the frequency is not enough to justify the purchase of the instrument, we can help. This service is also useful if you need an independent laboratory to verify your results. The cost of this service depends on the type and number of tests requested.
Qinsun Industries also provides an opportunity to “experience it for yourself”. We invite you to visit our laboratory or arrange on-site training seminars in your factory. In addition, Taber can also advise you on wear or scratch resistance testing. This may include recommendations for appropriate instrumentation systems; assisting in the development of test procedure understanding, interpreting evaluation techniques for results, and so on.
2021-08-16 10:57
