Product Introduction
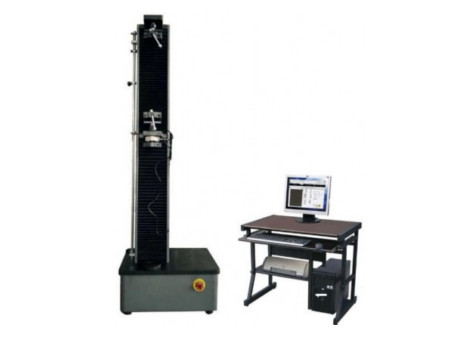
This series of testing machines realizes the automatic control of the test process, data acquisition and analysis through the computer, and realizes the full digitization and automation of the data acquisition, analysis and control process. The control and data processing software with WINDOWS as the operation interface realizes the computer display of test force, test force peak value, beam displacement, test deformation and test curve. The good humanized design makes the test operation easier. The machine can realize three closed-loop control of test force, deformation, and displacement, and can smoothly switch between control modes such as constant stress, constant strain, and constant displacement. It is widely used in industries such as waterproofing membranes to detect and analyze the mechanical properties of non-metallic and composite materials. It is an ideal testing equipment for scientific research institutions, universities, industrial and mining enterprises, technical supervision, quality inspection and other departments.
Product Structure Function
This series of testing machines are of single-arm structure.
1. This series of machines adopts AC servo motor and servo drive speed control system to drive the precision ball screw pair to move up and down, and then realize the wide range of stepless adjustment of the test speed, ensuring the high precision, low noise and high stability of the test process.
2. The test control system has the advantages of high integration, stable performance and convenient adjustment. The experimental data can be collected in real time, and the experimental characteristic curve can be dynamically displayed in real time. The experimental data files can be saved in the way of Access common databases, which is convenient for the realization of customer resource sharing and network management, as well as user re-analysis. For user-defined various word2000 reports, the software can be easily accessed, which solves the problem that different users or the same user have different needs for test reports in different periods. The software can process the original data of test force, displacement, time, deformation and curves derived therefrom.
3. Protection function: The machine has software and mechanical limit protection modes, and the proportion of automatic shutdown when the maximum load is exceeded can be dynamically set; it has multiple protection functions such as overcurrent, overvoltage, and overload.
4. The load and deformation channels can be automatically marked, which is intuitive and convenient.
5. The batch test can realize the hierarchical display of the curve, and the curve automatically follows.
6. The software can realize user-defined speed setting and computer adjustment of speed. It can also achieve high-precision speed calibration, and adjust the speed gear and code at any time.
7. Monitoring the test process: Real-time display of various parameters such as test force, deformation, displacement, and curve during the test process.
8. Software authority hierarchical management function: In order to improve the security of software and data, the software can realize the function of authority management by setting different password protection.
9. Result reproduction function: After the test operation is completed and saved, it can be opened and re-analyzed the test data at any time in the future according to the user's needs.
10. The software operation interface is shown in the figure (the software is slightly different for different test requirements).
Technical Parameters
1. Nominal Force: 5kN
2. Dual Column
3. Test speed: 0.1 – 500 mm/min (stepless speed regulation)
4. Deviation from set speed: ±0.1%
5. Accuracy level of force measurement: Level 1
6. Position accuracy: ± 1 microns
7. Position resolution: 0.02%-100%FS
8. Deformation measurement range: 0.02%—100% FS
9. Stretching space: 1000m
10. Test data recording rate: 400 kHz
11. Test data transmission rate to PC: 500 Hz
12. Maintenance-free AC drive motor
13. Power Supply: AC 220-240V, 60 Hz
14. Machine size: about 560 × 420 × 1650mm (length × width × height).
15. Machine weight: about 150 kg
16. Brand: QINSUN
17. Model: T200
Standard Configuration
1. Test machine host 1 set
2. 1 set of test control software
3. 1 set of data acquisition card
4. Stepper motor 1 set
5. Deceleration system 1 set
6. 1 sensor
7. Photoelectric encoder 1
8. 2 sets of ball screws
9. Stretching accessory 1 set
10. Compression accessories: pressure plate Φ100 1 pair
11. 1 set of random tools
12. Random documents, instruction manual, certificate, etc.
INCLUDES SOFTWARE G-TSF5, VERSION 2.0
With modules for determining:
a. Tensile and compression/elongation tests
b. Maximum force and extension
Evaluation of test results and monitoring tolerance
Prevention of unauthorized access: user management or password protection
Protection against manipulation of results: traceability records, electronic signatures
Force/strain control with the testing machine
With correction of machine deformation
Load cells and grips
► Load cell, 5 kN capacity
- Measuring range: 0.02kN to 5.00kN
- Accuracy: ±0.1% of reading
- Inclusion: Calibration certificate
► Pneumatic grips, 1 pair Fmax 5kN
- Controlled by foot switches
- Can be used also for asymmetrical gripping
- Test fixtures can be easily attached Inclusion: mechanism for attaching fixtures for smaller loads: Fixture bolt
► Test Fixtures or jaw inserts for Breaking, Tensile, Tearing Strength tests (Dimensions in height x width)
Set A: One pair each of 25mm x 25mm, 25mm x 50mm and Two pairs of 50mm x 75mm (Steel fishscale/ sawtooth-surface/or any unsmooth surface)
Set B: One pair each of 25mm x 25mm, 25mm x 50mm and Two pairs each of 50mm x
60mm, 50mm x 110mm (Steel smooth with high quality rubber cover/padding)
► Test Fixtures set for protective clothing resistance to puncture test
► Holding unit with Vulcollan cover with 34.9 mm inner diameter
► Probe with 0.5-mm tip (inner) diameter and 2-mm outer diameter
► Load cell, 500 N (for Puncture Resistance)
- Measuring range: 2N to 500N
- Accuracy: ±0.5% of reading
- With connection to primary load cell without removing the mounted load cell and/or
grips
- Inclusion: Calibration certificate
|
Item
|
Parameter
|
|
Brand
|
Qinsun
|
|
Power
|
7.7KW
|
|
Motor
|
1.0 hp
|
|
Working pressure
|
100 psi
|
|
Rotate speed
|
950 RPM
|
|
Cylinder capacity
|
180L
|
|
Weight
|
141kg
|
|
Dimension (D*W*H)
|
1490*490*975mm
|
UPS (UNINTERRUPTED POWER SUPPLY)
|
Item
|
Parameter
|
|
Brand
|
Schneider
|
|
Power Supply
|
1.2 KW
AC 220-240V, 60Hz
|
Standards Compliant
Manufactured according to GB / T2611 "General Technical Conditions for Testing
1. Manufactured according to GB / T2611 "General Technical Conditions for Testing Machines"
and GB / T 16491-2008 "Electronic Universal Testing Machine" standards;
2. Perform verification and acceptance according to GB / T12160 "Regulations for
Extensometer for Uniaxial Test" and GB / T16825 "Inspection of Tensile Testing Machine"
3. Applicable standards: apply ASTM D5034/D5035, ASTM D5587, DIN, ISO13934-1, JIS, BS and
other international standard
